NFC Text record
Overview
The NFC Text record sample shows how to use the NFC tag to expose a text record to NFC polling devices. It uses the NFC Data Exchange Format (NDEF).
When the sample starts, it initializes the NFC tag and generates an NDEF message with three text records that contain the text “Hello World!” in three languages. Then it sets up the NFC library to use the generated message and sense the external NFC field.
The only events handled by the application are the NFC events. The Red LED turns on when an NFC field is present.
Requirement of UF2 Bootloader
This sample requires your existing bootloader is at least 0.7.1, as older versions of UF2 Bootloader use NFC1 and NFC2 pins as GPIO functionality. Update the UF2 Bootloader if you are running the older bootloader.
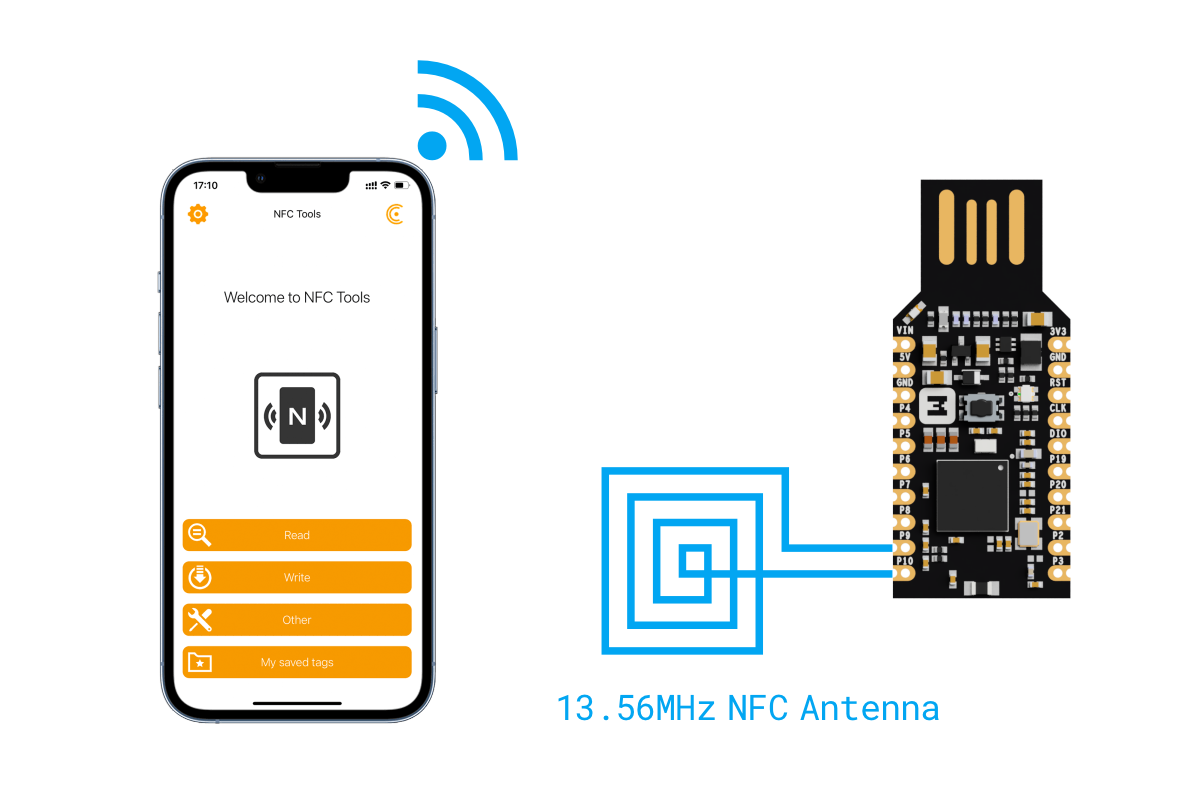
Requirements
Before you start, check that you have the required hardware and software:
- 1x nRF52840 MDK USB Dongle
- A 13.56MHz NFC Antenna
- A smartphone or a tablet with NFC support
- A computer running macOS, Linux, or Windows 7 or newer
Wiring the NFC antenna
Building the sample
Before you start building, remember to set up the environment first.
Use the following steps to build the NFC Text record sample on the command line.
-
Open a terminal window.
-
Go to
my-workspace/ncs-playgrounddirectory created in the Setting up the environment section. -
Build the sample using the
westcommand, specifying the board (following the-boption) asdongle_nrf52840:Tip
The
-p alwaysoption forces a pristine build, and is recommended for new users. Users may also use the-p autooption, which will use heuristics to determine if a pristine build is required, such as when building another sample. -
After running the
west buildcommand, the build files can be found inbuild/zephyr.
Flashing the firmware
The sample is designed to work with the UF2 Bootloader, so that you can easily flash the sample using the UF2 Bootloader. The firmware can be found in build/zephyr with the name zephyr.uf2.
To flash the firmware, complete the following steps:
-
Push and hold the button and plug your dongle into the USB port of your computer. Release the button after your dongle is connected. The RGB LED turns green.
-
It will mount as a Mass Storage Device called UF2BOOT.
-
Drag and drop
zephyr.uf2onto the UF2BOOT volume. The RGB LED blinks red fast during flashing. -
Re-plug the dongle and the sample will start running.
Testing
After flashing the firmware to your board, complete the following steps to test it:
- Plug the dongle into the USB port of your computer.
- Touch the NFC antenna with the smartphone or tablet and observe that Red LED is lit.
- Observe that the smartphone or tablet displays the encoded text (in the most suitable language).
- Move the smartphone or tablet away from the NFC antenna and observe that Red LED turns off.